I’ve been upgrading the MapTubeD tile renderer code to use the latest release of SharpMap and came across the problem of SharpMap not being a signed assembly. This is a real problem as MapTubeD is signed and so can’t reference an unsigned assembly. The rest of this post details how I built SharpMap from scratch and use the NuGet tools to sign all the referenced assemblies manually.
Before you start, make sure you have Powershell version 3.0 installed. I found that the previous version had an issue when doing a recursive dir command with a wildcard i.e. “dir -rec *.dll” didn’t work.
First, download the latest code release of SharpMap from here [link] by clicking on the “download” link. The changeset I’ve been using is 105237, but I found the download to be very slow, even on a very fast Internet connection.
It is very important to right click on the zip file before you unpack it, select “Properties” from the menu and click the “Unblock” button on the “General” tab. This prevents the warning from Visual Studio of using an application from an untrusted source.
Now extract the zip file to a suitable location.
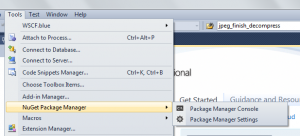
With the files unzipped, open Visual Studio 2010. If you don’t already have the NuGet package manager installed, follow the instructions to install it here: [NuGet]. Basically it’s just “Tools”, “Extension Manager”, “Online Gallery” and click on the download button for the “NuGet Package Manager”. Let the VSIX installer do its work and you should get a “NuGet Package Manager” option on your tools menu:
Open the SharpMap solution (Trunk\SharpMap*.sln) in Visual Studio so you have it open, but don’t compile anything yet. Ignore the Team Studio messages as you don’t need to log in. I also got an error regarding the SharpMap.Demo.WMS example project not being a supported project type, but I ignored this and continued.
Find the main SharpMap project in the “Solution Explorer” (it should be in bold), right click on it and select “Properties”. Click the “Signing” tab on the left, tick the “Sign the Assembly” box and click on the “Choose a strong name key file” drop down. Select “new” and enter “SharpMap.snk” in the “Key file name” box, but UNCHECK the “Protect my key file with a password” check box. Click save and close the dialogue.
Now do the same for the “GepAPI.Extensions” package above the main SharpMap one which you just signed. This time I used “GeoAPIExtensions” for the key file name, but everything else is the same.
Now do a “Build” and “Rebuild Solution” to build everything. If you get an error saying “check ‘Allow NuGet to download missing packages during the build’ “, then follow the instructions to change the NuGet download settings. I found mine was already set to download, but ended up clicking the “Update” button from the “Tools”, “NuGet Package Manager”, “Manage NuGet Packages for Solution…” window. This wasn’t necessary on the first computer I tried this on.
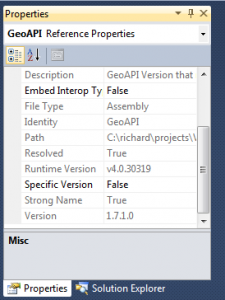
At this point you will see build errors relating to Strong Names i.e. Assembly generation failed — Referenced assembly ‘GeoAPI’ does not have a strong name. You can check this by right clicking the “GeoAPI.dll” in the “References” folder of the solution, selecting properties and seeing “Strong Name” and “false” in the properties window.
Now is the part where all the 3rd party assemblies need to be signed.
You need the Nivot Strong Naming package (full instructions [here]), so use the NuGet console to install it. Go to “Tools”, “NuGet Package Manager” and “Package Manager Console” and enter the following at the PM prompt:
PM> Install-Package Nivot.StrongNaming
This is the tool used to sign the package references that are included by SharpMap, namely BruTile, ProjNet, NetTopologySuite and GeoAPI.
The instructions on the Nivot FAQ page give examples of how to do this, but here is what I did:
PM> $root = join-path (split-path $dte.solution.filename) packages
This sets the directory containing the packages which are going to be signed, relative to the solution directory. All becomes clear when you examine what the variable root gets set to:
PM> echo $root
C:\richard\projects\VS-CS\sharpmap-105237\Trunk\packages
Then to load an unprotected key (no password):
PM> $key = Import-StrongNameKeyPair -keyfile SharpMap\sharpmap.snk
PM> dir *.dll | Set-StrongName -keypair $key -verbose
The response should be “Loaded SNK.” to show that the keyfile has been loaded. Now use this to sign the required assemblies:
PM> cd (join-path $root GeoAPI.1.7.1.1)
PM> dir -rec *.dll | Set-StrongName -keypair $key -verbose
You might get prompts asking about signing of sub assemblies, so just answer “Y”.
Now, when you look at the properties for the GeoAPI DLL under the “SharpMap\Resources” folder in the Solution Explorer, you should see that the “Strong Name” property has changed to “True” (see image above).
Repeat these two commands for the following packages:
PM> cd (join-path $root ProjNet4GeoAPI.1.3.0.2)
PM> dir -rec *.dll | Set-StrongName -keypair $key -verbose
PM> cd (join-path $root BruTile.0.7.4.1)
PM> dir -rec *.dll | Set-StrongName -keypair $key -verbose
PM> cd (join-path $root NetTopologySuite.1.13.1)
PM> dir -rec *.dll | Set-StrongName -keypair $key -verbose
PM> cd (join-path $root NetTopologySuite.IO.1.13.1.1)
PM> dir -rec *.dll | Set-StrongName -keypair $key -verbose
PM> cd (join-path $root NetTopologySuite.IO.SpatiaLite.1.13.1.1)
PM> dir -rec *.dll | Set-StrongName -keypair $key -verbose
Check the packages are signed by right clicking on the DLL under the “References” tab of the project and selecting “Properties”. The “StrongName” property should now show as “True” for all the packages above.
Rebuild all and SharpMap will now be a signed assembly with a strong name.


