Building and Signing SharpMap 1.1

I’ve been upgrading the MapTubeD tile renderer code to use the latest release of SharpMap and came across the problem of SharpMap not being a signed assembly. This is a real problem as MapTubeD is signed and so can’t reference an unsigned assembly. The rest of this post details how I built SharpMap from scratch and use the NuGet tools to sign all the referenced assemblies manually.

Before you start, make sure you have Powershell version 3.0 installed. I found that the previous version had an issue when doing a recursive dir command with a wildcard i.e. “dir -rec *.dll” didn’t work.

First, download the latest code release of SharpMap from here [link] by clicking on the “download” link. The changeset I’ve been using is 105237, but I found the download to be very slow, even on a very fast Internet connection.

It is very important to right click on the zip file before you unpack it, select “Properties” from the menu and click the “Unblock” button on the “General” tab. This prevents the warning from Visual Studio of using an application from an untrusted source.

Now extract the zip file to a suitable location.

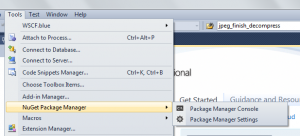
With the files unzipped, open Visual Studio 2010. If you don’t already have the NuGet package manager installed, follow the instructions to install it here: [NuGet]. Basically it’s just “Tools”, “Extension Manager”, “Online Gallery” and click on the download button for the “NuGet Package Manager”. Let the VSIX installer do its work and you should get a “NuGet Package Manager” option on your tools menu:

VS2010NuGetPackageManager

Open the SharpMap solution (Trunk\SharpMap*.sln) in Visual Studio so you have it open, but don’t compile anything yet. Ignore the Team Studio messages as you don’t need to log in. I also got an error regarding the SharpMap.Demo.WMS example project not being a supported project type, but I ignored this and continued.

Find the main SharpMap project in the “Solution Explorer” (it should be in bold), right click on it and select “Properties”. Click the “Signing” tab on the left, tick the “Sign the Assembly” box and click on the “Choose a strong name key file” drop down. Select “new” and enter “SharpMap.snk” in the “Key file name” box, but UNCHECK the “Protect my key file with a password” check box. Click save and close the dialogue.

Now do the same for the “GepAPI.Extensions” package above the main SharpMap one which you just signed. This time I used “GeoAPIExtensions” for the key file name, but everything else is the same.

Now do a “Build” and “Rebuild Solution” to build everything. If you get an error saying “check ‘Allow NuGet to download missing packages during the build’ “, then follow the instructions to change the NuGet download settings. I found mine was already set to download, but ended up clicking the “Update” button from the “Tools”, “NuGet Package Manager”, “Manage NuGet Packages for Solution…” window. This wasn’t necessary on the first computer I tried this on.

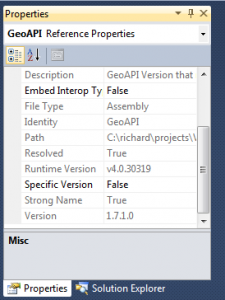
At this point you will see build errors relating to Strong Names i.e. Assembly generation failed — Referenced assembly ‘GeoAPI’ does not have a strong name. You can check this by right clicking the “GeoAPI.dll” in the “References” folder of the solution, selecting properties and seeing “Strong Name” and “false” in the properties window.

Now is the part where all the 3rd party assemblies need to be signed.

You need the Nivot Strong Naming package (full instructions [here]), so use the NuGet console to install it. Go to “Tools”, “NuGet Package Manager” and “Package Manager Console” and enter the following at the PM prompt:

PM> Install-Package Nivot.StrongNaming

This is the tool used to sign the package references that are included by SharpMap, namely BruTile, ProjNet, NetTopologySuite and GeoAPI.

The instructions on the Nivot FAQ page give examples of how to do this, but here is what I did:

PM> $root = join-path (split-path $dte.solution.filename) packages

This sets the directory containing the packages which are going to be signed, relative to the solution directory. All becomes clear when you examine what the variable root gets set to:

PM> echo $root

C:\richard\projects\VS-CS\sharpmap-105237\Trunk\packages

Then to load an unprotected key (no password):

PM> $key = Import-StrongNameKeyPair -keyfile SharpMap\sharpmap.snk
PM> dir *.dll | Set-StrongName -keypair $key -verbose

The response should be “Loaded SNK.” to show that the keyfile has been loaded. Now use this to sign the required assemblies:

PM> cd (join-path $root GeoAPI.1.7.1.1)
PM> dir -rec *.dll | Set-StrongName -keypair $key -verbose

You might get prompts asking about signing of sub assemblies, so just answer “Y”.

GeoAPIStrongName

Now, when you look at the properties for the GeoAPI DLL under the “SharpMap\Resources” folder in the Solution Explorer, you should see that the “Strong Name” property has changed to “True” (see image above).

Repeat these two commands for the following packages:

PM> cd (join-path $root ProjNet4GeoAPI.1.3.0.2)
PM> dir -rec *.dll | Set-StrongName -keypair $key -verbose

PM> cd (join-path $root BruTile.0.7.4.1)
PM> dir -rec *.dll | Set-StrongName -keypair $key -verbose

PM> cd (join-path $root NetTopologySuite.1.13.1)
PM> dir -rec *.dll | Set-StrongName -keypair $key -verbose

PM> cd (join-path $root NetTopologySuite.IO.1.13.1.1)
PM> dir -rec *.dll | Set-StrongName -keypair $key -verbose

PM> cd (join-path $root NetTopologySuite.IO.SpatiaLite.1.13.1.1)
PM> dir -rec *.dll | Set-StrongName -keypair $key -verbose

Check the packages are signed by right clicking on the DLL under the “References” tab of the project and selecting “Properties”. The “StrongName” property should now show as “True” for all the packages above.

Rebuild all and SharpMap will now be a signed assembly with a strong name.

Desktop Supercomputing

When dealing with real life data, I often think of the quote from the Hennessy and Patterson book on computer architecture which states that:

For many applications, the highest performance microprocessors of today outperform the supercomputer of less than 10 years ago.

It’s here on page 2 if you want to read it yourself: http://www.academia.edu/3770508/john_-L_Hennessy_and_David_A_Patterson_computer_architecture

So, the question which is always at the back of my mind is, “what were we doing on supercomputers 10 years ago that we should be doing on the desktop today?“.

Recently I’ve been working on a spatial interaction model that uses the latest release of the ONS travel to work data (see WU03EW here: https://www.nomisweb.co.uk/census/2011/bulk/rOD1).

As there are 7,200 areas in the MSOA geography file, this involves algorithms operating on matrices containing 7200×7200=51,840,000 items. Naturally, the architecture to look at has been OpenCL, but, whereas I last used this to do k-means clustering in native C++, now I’m having to build with C# and .net assemblies.

After some research, I decided to use OpenCL.net over CUDAfy.net as I wanted a lightweight wrapper around OpenCL and CUDAfy looked more complicated than I needed, even if it looks to be more popular.

OpenCL.net can be installed very easily into a Visual Studio 2013 project using the NuGet package as follows:

PM> Install-Package OpenCL.Net

Then I tried running the example provided in the download, only to find that it doesn’t work, which is a real shame as the library itself works just fine. So, broken example aside, here are some of the important modifications which I had to make to get a simple reduction kernel working. These are all based around modifications to the example code which can be found here: Program.cs

I should point out at the very beginning though, that I’m not doing a normal reduction here, but producing sums of each individual row of the matrix. As my application doesn’t have the same level of parallelism, I’m not expecting to get anywhere near the theoretical maximum throughput here, although what I’m looking at for the future might.

Just for completeness, here is my CPU implementation in C# which I’m using for my baseline comparison:

[code language=”csharp”]

//now test the results
float Epsilon = 1.0E-2f;
int correct = 0;
for (int i = 0; i < ArrayLength; i++)
{
if (i % 100 == 0) System.Diagnostics.Debug.WriteLine("i=" + i);
float sum = 0;
for (int j = 0; j < ArrayLength; j++)
{
sum += MatA[i,j]; //a_cpu[i*ArrayLength+j];
}
float delta = Math.Abs(c_cpu[i] – sum);
if (delta > Epsilon) System.Diagnostics.Debug.WriteLine(i + " Error: delta=" + delta + " " + c_cpu[i] + "!=" + sum);
else ++correct;
}
System.Diagnostics.Debug.WriteLine(correct + " rowsum values correct out of a total of " + ArrayLength);

[/code]

The following steps show the implementation of the same algorithm using a GPU kernel, detailing the OpenCL.net modifications I had to make to get it to work in VS2013.

My environment isn’t Intel, so get an environment for the AMD GPU:

[code language=”csharp”]

env = "*AMD*".CreateCLEnvironment();

[/code]

Next, create the buffers from the matrix data currently in memory. ‘ArrayLength’ here is 4096 for testing, but the value is the number of rows or columns (=4096×4096) in my data matrix which is ‘MatA’.  I just randomised ‘MatA’ for testing, so it’s not using real data here. The ‘a’ and ‘a_cpu’ buffer contains the input data, while the ‘b’ and ‘b_cpu’ buffer contains the output data. Due to the restrictions on workgroup size, the row reductions have to be performed in two operations, so ‘NumPartialResults’=16 (4096/256) which means that the first run leaves each row with 16 values that need to be added together in the second run:

[code language=”csharp”]

long createBuffers = timer.ElapsedMilliseconds;
float[] a_cpu = new float[ArrayLength*ArrayLength]; //this is one row at a time
int NumPartialResults = (int)Math.Ceiling(((float)ArrayLength) / 256.0f); //(partial results per row) where 256 is the workgroup size
float[] b_cpu = new float[ArrayLength*NumPartialResults]; //allocate for number of rows and PartialResults
Buffer.BlockCopy(MatA, 0, a_cpu, 0, ArrayLength * ArrayLength * sizeof(float)); //copy row 0 of MatA into buffer
IMem<float> a = env.Context.CreateBuffer(a_cpu, MemFlags.ReadOnly);
IMem<float> b = env.Context.CreateBuffer(b_cpu, MemFlags.ReadOnly);

[/code]

Set the arguments which are passed to the kernel:

[code language=”csharp”]

Cl.SetKernelArg(k_rowsum, 0, (uint)ArrayLength); //M=columns of a[] matrix
Cl.SetKernelArg(k_rowsum, 1, (uint)NumPartialResults); //N=columns of b[] matrix
Cl.SetKernelArg(k_rowsum, 2, a);
Cl.SetKernelArg(k_rowsum, 3, b);
Cl.SetKernelArg<float>(k_rowsum, 4, ArrayLength); //__local sdata

[/code]

Note the use of the raw “Cl” functions which were my main reason for choosing this library in the first place. All the basic OpenCL library functions are accessible from here.

Compile the kernel:

[code language=”csharp”]

k_rowsum = env.Context.CompileKernel(@"rowcolsum_kernel.cl", "rowreduction2");

[/code]

And finally, run the kernel twice, passing the partial result back in for the second run:

[code language=”csharp”]

Event kernelRun = env.CommandQueues[0].EnqueueKernel(k_rowsum, globalWorkSize0: ArrayLength, globalWorkSize1: ArrayLength, localWorkSize0: 256, localWorkSize1: 1);
env.CommandQueues[0].ReadFromBuffer(b, b_cpu, waitFor: kernelRun);
//then we need to run again to coalesce partial results
Cl.SetKernelArg(k_rowsum, 0, (uint)NumPartialResults); //M=columns of a[] matrix (b from the last go)
Cl.SetKernelArg(k_rowsum, 1, (uint)1); //N=columns of b[] matrix (1 as this is the final coalesce)
IMem<float> b2 = env.Context.CreateBuffer(b_cpu, MemFlags.ReadOnly);
Cl.SetKernelArg(k_rowsum, 2, b2);
float[] c_cpu = new float[ArrayLength];
IMem<float> c = env.Context.CreateBuffer(c_cpu, MemFlags.ReadOnly);
Cl.SetKernelArg(k_rowsum, 3, c);
Cl.SetKernelArg<float>(k_rowsum, 4, ArrayLength); //__local sdata
//as long as NumPartialResults<256, then you can coalesce the 4xCols b matrix into 1xCols c matrix for the final results
Event kernelRun2 = env.CommandQueues[0].EnqueueKernel(k_rowsum, globalWorkSize0: (uint)NumPartialResults, globalWorkSize1: ArrayLength, localWorkSize0: (uint)NumPartialResults, localWorkSize1: 1, waitFor: kernelRun);
env.CommandQueues[0].ReadFromBuffer(c, c_cpu, waitFor: kernelRun2);

[/code]

My GPU kernel code is as follows:

[code language=”cpp”]

__kernel void rowreduction2(unsigned int M, unsigned int N, __global float* a, __global float* b, __local float* sdata)
{
//M is the length of the input row (a[]), N is the length of the output row (b[])
//M is surely get_global_size(0) ? NO, WG size has to be a multiple of global size so you might get null columns
unsigned int localidx=get_local_id(0);
unsigned int globalidx=get_global_id(0);
unsigned int globalidy=get_global_id(1);
unsigned int groupidx=get_group_id(0);
unsigned int groupidy=get_group_id(1);
unsigned int wgsizex=get_local_size(0);
//unsigned int wgsizey=get_local_size(1); //not needed

sdata[localidx]=(localidx<M) ? a[globalidx+globalidy*M] : 0;

barrier(CLK_LOCAL_MEM_FENCE);
for (unsigned int offset=wgsizex>>1; offset>0; offset>>=1) {
if ((localidx<offset)&&((localidx+offset)<wgsizex))
sdata[localidx]+=sdata[localidx+offset];
barrier(CLK_LOCAL_MEM_FENCE);
}
barrier(CLK_LOCAL_MEM_FENCE);

if (localidx==0) b[groupidy*N + groupidx]=sdata[0]; //note the b[] y vector location
}

[/code]

The bottom line is that the GPU code takes about 66ms to run, while the CPU takes about 81ms. Optimisation of GPU code is notoriously difficult, and this kernel has already had some work done to enable it to beat the CPU. Reading some of the Nvidia documentation is interesting, as they have a worked example on optimising a reduction kernel:

http://developer.download.nvidia.com/assets/cuda/files/reduction.pdf

For an application like this, the algorithmic intensity is very low, so Nvidia’s estimate of 86.4GB/s for a G80 applied to my Radeon HD9600M becomes 115.2GB/s, which equates to 3.6×1000 million single precision floats (4 bytes) per second based on memory bandwidth being the limiting factor. Taking Nvidia’s figures from their Kernel 1: (2^22*4)/8.054ms/1000000000=2.083 GigaBytes per second. I’ve got 4096×4096 floating point values in my test data, so, taking 66ms as the time works out at a bandwidth of 1.017GBs. This could potentially run 100 times faster if I could make full use of the GPU bandwidth.

I’ve started some performance testing using CodeXL, but I’ve yet to explore using different types of buffers to see how much difference it makes to the setup time with the GPU code. In order to get CodeXL to work with OpenCL.net I had to copy the “OpenCL.Net.dll” assembly file into “obj/Debug”, otherwise you get an “assembly not found” error. It might be possible to do this in the CodeXL project settings, but I haven’t explored that option yet.

All the timings above exclude the buffer copy, which is taking around 40ms on its own. The GPU algorithm only makes sense for very large matrix sizes, when the speed of the highly parallel algorithm overcomes the greater setup time compared to the CPU. I’m looking at around 52 million values with the next stage having a higher algorithmic intensity, so progressing the GPU code in line with other parallel CPU implementations makes sense.

Going back to my initial comment about what we should be using this “supercomputing” capability for, it’s actually quite a difficult question to answer. “Fast Data” is probably a good answer though, as by doing complex analytics on things like real-time transport data we can predict where problems are likely to occur. Other forms of urban modelling are also good candidates, especially anything involving computations on large matrices.

Useful Links:

http://www.academia.edu/3770508/john_-L_Hennessy_and_David_A_Patterson_computer_architecture

https://openclnet.codeplex.com/

http://developer.download.nvidia.com/assets/cuda/files/reduction.pdf

http://www.amazon.co.uk/Heterogeneous-Computing-OpenCL-Revised-1-2/dp/0124058949/ref=sr_1_7?s=books&ie=UTF8&qid=1416491744&sr=1-7&keywords=opencl

https://www.nomisweb.co.uk/census/2011/bulk/rOD1

http://developer.amd.com/tools-and-sdks/opencl-zone/codexl/